Pages

Sunday, November 3, 2013

All music in old tom & jerry

 All music tracks  used in Tom & jerry

1. Baby Puss - 1943 - "Mamãe Eu Quero"

2. Solid Seranade - 1946 - "Is you is or Is you ain't(My Baby)"

3. Cat Concerto - 1947 - "Hungarian Rhapsody no.2"

4. Kitty Foiled - 1948 - "The Barber of Seville"

5. Tom and Jerry in the Hollywood Bowl - 1950 - "Die Fledermaus"

6. The Flying Cat - 1952 - "Grande Valse brillante in E-flat major, Op.18"

7. The Two Mouseketeers - 1952 - "Alouette"

8. Pecos Pest - 1955 - "Froggy Went a Courtin'"

9. Royal Cat Nap - 1958 - "Frère Jacques"

10. Carmen Get It - 1962 - "Carmen"

11. The Cat Above and The Mouse Below - 1964 - "The Barber of Seville"

12. Snowbody Loves Me - 1964 - " Waltz in A-Flat major, Op. 34 No.1"

                               Tell in comment which one you Like most
                                                 I like the first one

What is Direct CU II


Direct CU II


           Direct CU II means direct cooper, which means the copper heat pipes are directly touching the GPU instead of a copper base plate with the copper heatpipes running through. I don't think they are as good as the Twin Frozr. They have Direct CU heatsink on the 6970 and GTX 570 but it will take up 3 slots.
          It is new marketing technique by Amd to sold their old 7000 series Gpu by re branding and New R series Gpu. The Hardware are as same same as capable of Direct X11.2 and openGL 4.3 as the 7000 series .
        To sold this new Gpu's amd dont launch newer driver thats support Direct X11.2 for 7000 series. hence the R series are the only one who support Newer Direct X.
         Direct CU II is not any new version of Direct X but just new way of cooling technique thats used by other gpu,s already but not specifically  advertised by other Gpu's.
       It is better to buy newer as they are come with good cooling not else if we compared to 7000 series gpu.
      The 8000 series and 7000 series both have same performnce and other things 8000 is also re branding of 7000 series

What's new in Android 4.4 kitkat

Android 4.4

            Android 4.4 is designed to run fast, smooth, and responsively on a much broader range of devices than ever before — including on millions of entry-level devices around the world that have as little as 512MB RAM.
              KitKat streamlines every major component to reduce memory use and introduces new APIs and tools to help you create innovative, responsive, memory-efficient applications.
              New karnel(karnel 3.4) said to be used lower ram to run kitkat on lower end devices. It is to be said that the devices must be power by 1ghz processor (armV7) to perform smoother.
             The android kitkat releases with the new LG's nexus 5 on last month (31 October 2013  ).
Android apps can now print any type of content over Wi-Fi or cloud-hosted services such as Google Cloud Print. In print-enabled apps, users can discover available printers, change paper sizes, choose specific pages to print, and print almost any kind of document, image, or file.
Android 4.4 introduces native platform support for printing, along with APIs for managing printing and adding new types of printer support. The platform provides a print manager that mediates between apps requesting printing and installed print services that handle print requests. The print manager provides shared services and a system UI for printing, giving users consistent control over printing from any app. The print manager also ensures the security of content as it's passed across processes, from an app to a print service.
          
           A new storage access framework makes it simple for users to browse and open documents, images, and other files across all of their their preferred document storage providers. A standard, easy-to-use UI lets users browse files and access recents in a consistent way across apps and providers.
Box and others have integrated their services into the storage access framework, giving users easy access to their documents from apps across the system.
Cloud or local storage services can participate in this ecosystem by implementing a new document provider class that encapsulates their services. The provider class includes all of the APIs needed to register the provider with the system and manage browsing, reading, and writing documents in the provider. The document provider can give users access to any remote or local data that can be represented as files — from text, photos, and wallpapers to video, audio, and more.
If you build a document provider for a cloud or local service, you can deliver it to users as part of your existing Android app. After downloading and installing the app, users will have instant access to your service from any app that participates in the framework. This can help you gain exposure and user engagement, since users will find your services more easily.
             Android 4.4 introduces platform support for hardware sensor batching, a new optimization that can dramatically reduce power consumed by ongoing sensor activities.
            If you develop a messaging app that uses SMS or MMS, you can now use a shared SMS provider and new APIs to manage your app's message storage and retrieval. The new SMS provider and APIs define a standardized interaction model for all apps that handle SMS or MMS messages.
            To get the most impact out of your content, you can now use new window styles and themes to request translucent system UI, including both the status bar and navigation bar. Notification listener services can now see more information about incoming notifications that were constructed using the notification builder APIs.

           Android 4.4 includes a completely new implementation of WebView that's based on Chromium. The new Chromium WebView gives you the latest in standards support, performance, and compatibility to build and display your web-based content.
Chromium WebView provides broad support for HTML5, CSS3, and JavaScript. It supports most of the HTML5 features available in Chrome for Android 30. It also brings an updated version of the JavaScript Engine (V8) that delivers dramatically improved JavaScript performance.
             Now it's easy to create high-quality video of your app, directly from your Android device. Android 4.4 adds support for screen recording and provides a screen recording utility that lets you capture video as you use the device and store it as an MP4 file. It's a great new way to create walkthroughs and tutorials for your app, testing materials, marketing videos, and much more.
           
For high-performance, lower-power audio playback, Android 4.4 adds platform support for audio tunneling to a digital signal processor (DSP) in the device chipset. With tunneling, audio decoding and output effects are off-loaded to the DSP, waking the application processor less often and using less battery.
Audio tunneling can dramatically improve battery life for use-cases such as listening to music over a headset with the screen off. For example, with audio tunneling, Nexus 5 offers a total off-network audio playback time of up to 60 hours, an increase of over 50% over non-tunneled audio.
Apps can use new monitoring tools in the Visualizer effect to get updates on the peak and RMS levels of any currently playing audio on the device. For example, you could use this creatively in music visualizers or to implement playback metering in a media player.
              Android 4.4 support for two new Bluetooth profiles to let apps support a broader range of low-power and media interactions. Bluetooth HID over GATT (HOGP) gives apps a low-latency link with low-power peripheral devices such as mice, joysticks, and keyboards. Bluetooth MAP lets your apps exchange messages with a nearby device, for example an automotive terminal for handsfree use or another mobile device. As an extension to Bluetooth AVRCP 1.3, users can now set absolute volume on the system from their Bluetooth devices.
           Android 4.4 updates its SELinux configuration from "permissive" to "enforcing." This means potential policy violations within a SELinux domain that has an enforcing policy will be blocked.


source
 

Sunday, April 28, 2013

How to Make longer life of Battery life of Android Phone


  • Display brightness-
           If your android does not have Ambient light sensor your display does not automatically change it's brightness. So high brightness causes loss of high battery charge even on night when the we can see clearly on low brightness. Make always sure that display brightness is very low for better battery saving.

  • Sleep time-
           The sleep time is time when phone's display auto off or you maky say Display lock time. Reduce Sleep time to Minimum 5.Sec to get better battery by turning off display quickly.

  • Wallpaper-
          Use black and Dark wallpapers instead light and White wallpaper which help you to save a battery. This will help you save your battery from 1% to 5% and depend upon wallpaper. Use dark theme also to better battery reliability.

  • Widget-
         Remove widget that are not used such as Weather widget, Facebook widget, Help,photo gallery,
photos,play Store, recommender, timescape friends, top contacts etc. due to Widget you lost about 20% of battery. so turn of display.

  • Internet and Sync-
        Using WiFi, 3G , 2G , GPS , HotSpot(Share internet with Others) causes Drain of battery turn of this when not in Use 3G ans wifi drains more battery than 2G so use always 2G network instead of 3G and Wifi. turn of Auto-Sync or keep long time instead of short for Sync.

  • Turn off auto Update of system and apps-
         Auto update are run in background without our notice and do app update or your mobile system up to date. But due running in background they eat up battery on slow speed by running for longer Time for Update.
  • Bluetooth-
       Turn of Bluetooth after sharing file or receiving the file make sure your Bluetooth it not consuming battery too much.

  • Live wallpapers-
        live wallpapers look really nice on phone display but the fact they consume battery and ram both at high amount .

  • Kill tasks-
        To save battery you have stop unwanted running in the background use Advanced Task Manager - Killer do some tricks and tips that will help to kill the apps while sleeping.

 download here

Some more tips-

  1. Go into setting>Battery and checkout which app causing you to drain your more battery.
  2. Switch off and Power on causes battery drain faster.
  3. Make sure your battery life is good
  4. charge battery only when it goes below 20% and charge full above 90% continuous little little charging causes poor battery life and drains faster
  5. In night if you dont want to use network or internet disable WiFi, 3G , 2G , GPS , HotSpot etc.
  6. If you don't attending calls at night or not even call other disable Sim which make no network for your sim and help to prevent battery from draining usingg network
  7. If you are in meeting or school or collage switch off phone instead of keeping phone silent mode.
  8. Dont use  anti virus, ram booster apps, battery apps,Memory card Booster They are not give you good performance but drains more battery.

 Make Sure to Checkout My Other Post and share with Other.


Saturday, April 27, 2013

Use your phone as a webcam on your computer over WiFi or USB


        (For webcam you require to use Android Phone)

             DroidCam is a bit easy to install on windows also on linux download PC client here. DroidCam the free version doesn’t allow you to change the video format or resolution so make sure to purchase the app. 


            Droidcam works with Gmail chat and Skype. Wi-fi work fine even they are complicated . make sure you downloaded app correctly. Download this app for your android phone here   you have required phone with Android 2.1+ to use this...
          
          camera flash, auto focus, zoom are available 


Setup


  • Go to their website to get the application for your computer and install it.
  • Open the app on your computer and the app on your phone. 
  • On your computer, choose which method to use (Wi-fi, USB, or Bluetooth)
  • If you’re using Wi-fi, enter the IP address that appears in the app on your phone into the DroidCam client and select audio, video, or both (only video is possible via Bluetooth)
  • Click Connect on the DroidCam client to start streaming video (if using Bluetooth, click Prepare)
  • In Skype or Gmail chat video settings select “DroidCam” as the source.

Make sure to share the page with others and see other posts.


Tuesday, April 23, 2013

How to increase Speed Of Internet.....


                To increse Your internet you need a Good software which help in your downloading 
Their are Three of them who used by number of people


             As you heard Clean marketing technique used by most ISP or not see here.  If you really want to Get good speed you have to Download One of three download managers. They are really nice in terms of speed but I personally recommended you to Use DAP(Download accelator Plus) . You download Free version of DAP without any tension as it also give full speed for your download without crashing plugin in browser. You can download without problem even if your browser crashes while downloading your download still running .If you Downloaded or downloading any video using DAP you can get headache.


             The IDM is not free hence I not recommended to use but it's much more better than the DAP or FDM. It,s fast and much more better to Download Videos of YouTube or anywhere within same page as compared to DAP which hrd to recognized which video downloading from same page if their are numbers of videos are playing on same page. Off you want use IDM you can use used it as it is trial for 30 Days for first Time.


             Free download manager is open-source software released under GNU(General Public License) GPL. FDM give feature to Download Torrent/BitTorrent files using BitTorrent protocol.
Which is Unavailable in IDM or DAP.


          Go best what you like and comment which is your download manager.


Thursday, April 18, 2013

How to Burn Iso Files in CD

         To create Bootable CD You have Required Any .iso file(image file) . Download Ubuntu Latest .Iso File From here. Now you want an Iso file Burning Software (Such as Demon Tools,PoweISO,Nero etc.) 
                  
                  I use use PowerISO for these tutorial you can download it from here. they give you trial version for 30 Days. If you like powerISo you can buy it. 
1.  Download Power iso  and install it on your computer.

2.  Now you have Open Power iso from start.

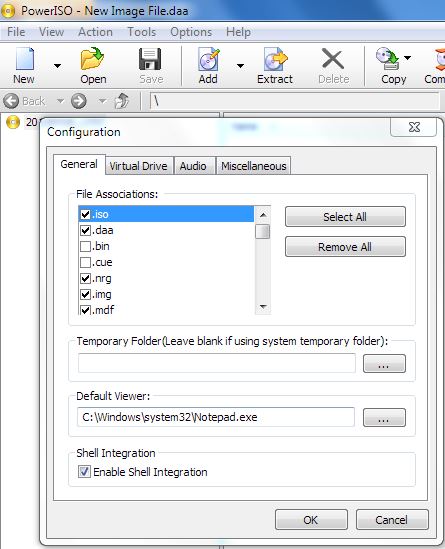
3. Now Click options on Power iso and click on configuration...


4. Now click on select All or tick .iso from list and Click Ok

5. Now Locate .iso File and and open it.
6. After opening Click on Butn And Choose Burning Speed 4x (slow burning speed give Good life to CD.)

 7.After Successful burning CD Will Ejected

Note-

  • Make Patience while Burning it Required time To Burn.

  • high speed Burnning Causes scratches on disk surface.

  • Make Sure you PC Does not lack power supply mainly in laptop as pc shutdown CD burns half and never burn again

  • Do not press power or restart Button

  • After burning iso and other image files you cannot able to burn other files on CD so use Your default Burner to burn your Data and use poweriso only to burn .iso or image files.

Wednesday, April 17, 2013


How to Create portable ubuntu drive


UBUNTU DRIVE
             Due to hard disk crash can't able use over PC but when this situation comes to me i am still uses my desktop and its internet without present of my hard disk by simply using Ubuntu and my 8GB sandisk cruzer pendrive.
    
             what happens really my hard disk crashed and not working so i give for replace. At jan 2012 their is high shortage in hard drive. So i have got my replaced after a month for this reason. So i like to use internet and social networking and watching videos but no hard disk i cant run os on my computer. So i have Got an idea to run Ubuntu on my Sandisk cruzer. I just put the ubuntu installation disk install Ubuntu on my pendrive reboot system after installation remove installation Disk go into bios and keep boot priority on pendrive and Wola.........! my ubuntu login comes in my front i login and run ubuntu for month without any problem on my computer. I have good cpu with intel core2 duo 2.0Ghz(old but ok). 1GB ram and Asus mobo which is compatible to boot from pendrive, extrnal drive, Usb Drives, Cd drives And hard disks.This pen drive ubuntu runs on my friends PC i just keeps his priority on boot from hard disk to pendrive on his pc also its run then what i do i copied one video on my pendrive space from his hard disk (Even from booting pendrive i able access his data). I also able to use my pendrive as pendrive to and portable ubuntu OS that really nice.Go anywhere ubuntu is with you. Same things i do with even laptop also get suprt nice.
         

          Tf you Wanted To create this you have required Pendrive at least 8GB or more also motherboard which able to boot from USB disk drive or Pendrive. and also a Good Usb Port to connect pendrive loose USB slot may damages pedrive also crashed Ubuntu while running.

         It is better if you disconnect hard disk by removing sata or pata cable connected to Hard disk
 I will show you how create bootable ubuntu CD here
     
After making CD  Insert or leave the CD in your CD/DVD-ROM device, and reboot the computer in order to boot from the CD. Hit the F8 or F12 key (depending on your BIOS) to select the CD/DVD-ROM as the boot device.( i use Ubuntu 8.04 version you will version which you like )

1.Select Your language for seeing installation language

2. Select the second option "Install Ubuntu," and hit the “Enter” key
 3.Wait to load Ubuntu from CD it shows welcome screen after booting..........
When the installer appears, you are able to select your native language for the installation process. Click the “Forward” button to continue...


4. Choose your country and click forward.........
5. select your keyboard layout by by typing ubuntu automatically detects your keyboard language
Click the “Forward” button when you have finished with the keyboard configuration...
 6. After doing that it will show your drives connected(Hard disk, pen drives, USB hdd )make sure you disconnected hard disk or make perfect selection of your pendrive(If you wrongly selected hard disk it will formated make sure you are selected pendrive)


7. create your profile by typing name, Login name,Password, Give Compute name as Portable Computer.
8.Make Sure You select pendrive to install boot loder
click on advance and choose your pendrive for device boot loader installation 
and click ok.
9.Now Ubuntu start to Install..................wait until it says "installation completed".
10. After Clicking on restart now.......it will eject installation disk from CD rom then its ask to remove the disk. after removing disk press enter and while restarting quick tab on bios keys of motherboard and change priority to Usb Drive or Pendrive Or something like that from Boot from cd.make sure you save settings of bios.
It's almost done Pc will Starting to boot From Pendrive.
11. when you See login Window just type Username and Press Enter And Then Type Password.You Got Ubuntu Running from pendrive to your Pc.
12.When You Login You will See the Above Image....


if you want use in another pc just shutdown your ubuntu 
take  out the pendrive with ubuntu on it install 
connect it to another persons laptop or Desktop and turn his/her pc/laptop
go into his bios and set priority to  Usb Drive or Pendrive Or something like that and save Bios Settings and Done.


Tuesday, April 16, 2013

How consumer get cheated by ISP(internet service providers)?


                  Their many internet service provide not only in computer releted internet also in mobile,3G,net setter etc. They promise us to give Upto 512Kbps, 1Mbps, 2Mbps but in actually we only get upto 70KB, 128KB , 256KB Speed. The reason behind is they cheated in Terms of bit and Byte
                    here  i will tell what is bit and byte                    
1bit  =  0 or 1(as binary language) 
and 
                             8bit = 1Byte                            
        
            When they releases new plan even sale their older plan in bit speed not a Byte.In their every plan  Upto 512Kbps, 1Mbps, 2Mbps. Their is small b states that download is in bit and not Byte. This is marketing plan used by most ISP. If we see on computer which actually uses Byte and show download upload in always Capital B .Ihis we get divide by eight of speed in our Computer, Laptop, smartphone or Java phone. In our computer Show the speed after diving by 8 as 64KBps for 512Kbps plan. People hurry and call ISP and ask for reason they might give same reason and ask reason for for that much Low. Some times Even Call taker from consumer also Don't know the above marketing technique of their company they say sorry to customer and tell the lie to we increase your speed (As their work is to tell lie to consumer and settel down clam).
          Their is high upgrade in marketing to cheat consumer.The funnier thing is I getting  256KBps speed on  my by 512Kbps speed. This means i get upto 2Mbps on my MTNL triband service that really funny. I also think this is low but my friends stuck on poor speed with other plans. they tell me this marketing technique as i my not good in marketing . for my plans user get good speed until april of 2011 letter we all suck on the poor speed that is 64KBps. I miss that speed.
          I use MTNL beacause other provider really suck while giving speed in india they uses password ans username technique for using internet on PC but sucks due slower activation , wrong password or username. They give bill on time but not speed and connection. they cut connection when we not pay bill regular or even cut when we pay on regular Basis.
so what will speed got on your plans in this marketing technique -

256 kbps                  = 32 KBps

512 kbps                  = 64 KBps

1024 kbps(1 Mbps)  = 128 KBps

2048 kbps(2 Mbps)  = 256 KBps

4096 kbps(4 Mbps)  = 512 KBps                  

Sunday, April 14, 2013

Best bugdet Graphic cards for year 2012-13


Their three graphics card best for current Gaming- 

  1. AMD Radeon™ HD 7750 


  2. GeForce GTX 550 Ti 


  3. AMD Radeon™ HD 6670


    1. AMD Radeon™ HD 7750 -

    Radeon HD 7750

               The Radeon HD 7750 is Mid-range cards which is PCI Express 3.0 x16 bus interface but older interface. The graphic card does not required external power supply as it run without it. The recommended power supply 400W or greater, still work nicely on 300W powersupply.
    The Graphic card itself supports DirectX 11.1 for Future gaming on windows 8 to run DirectX 11.1 games still their are some game that uses Uses only upto DirectX11. The HD 7750 uses only 55 Watts of total power supply through motherboard only no external power supply requirement. The graphic card supports Up to 2GB GDDR5 Memory upto 4.5 Gbps GDDR5 Memory Clock. The Gpu has itself 512 Stream Processors. Amd uses Ultra-low idle power when the system’s display is off. Support
    multiple quad display on single Radeon HD 7750. OpenGL 4.2 support with pixel shared 5.0.

    2. GeForce GTX 550 Ti  -


       If you have GTX 550Ti their is no need worry of gaming. This graphic card play all games in ultra high setting with an better resolution. Graphic card itself supports DirectX 11 due to which lower as compared to Direct X11.1 of Radeon HD 7750 but Still beats HD 7750 in Gaming performance. The graphic card supports OpenGL 4.1 .This really choosen by best gamers after 8000GTX,GeForce 8800 Ultra of nvidea 8000 series and GeForce 9800 GX2 GeForce 9800 GTX of 9000 series which supports upto Direct X10 Still used for gaming. The 550Ti supports NVIDIA PhysX. It has 192 CUDA Cores with 900MHz Graphics Clock and 
    Processor Clock of 1800Mhz.  4.1 Gbps Memory Clock comes with 1GB or 2GB GDDR5 Memory. The 550Ti  Supprts Nvidea's Sli Technique.The shader model is 5.0.The itself require external power supply to power up GPU and Its Fan.

    3.Radeon HD 6670-

     The radeon Hd 6670 comes in very bugdet for every one and play well but not both above card but gives good Frames in Gaming With Medium to ultra high preset graphics on good resolution upto 40fps+.The graphic card in DirectX11 supports and comes in 512MB to 1GB GDDR5 memory. It has 480stream processor with OpenGL 4.1 and Shader version 5.0. This crossfire Gpu With powersupply requirement take 63 watts.
    PCI Express 2.0 x16 bus interface this famous for midrange budget gamers.


    Radeon HD 7750
    GeForce GTX 550 Ti
     Radeon HD 6670
    Powe required(Lower is Better)

    55 watts

    116 watts

    63 watts
    Memory Bandwidth(Higher  is Better)
    72000 MB/sec
    98496 MB/sec
    64000 MB/sec
    Texel Rate(Higher is Better)
    25600 Mtexels/sec
    28800 Mtexels/sec
    19200 Mtexels/sec
    Pixel Rate(Higher is Better)
    12800 Mpixels/sec
    21600 Mpixels/sec
    6400 Mpixels/sec
    Windows Experience index(Higher is Better)
    7.4
    7.1
    7.3

    So their is no long way for gaming go get one of this for gaming. The Above graphic card goes long Way upto 2014-2015 for gaming.